


If you are building a SaaS business inside GoHighLevel, Stripe is not just another integration. It is the engine that powers your recurring revenue.
Without Stripe connected correctly at the agency level, your SaaS Mode simply cannot function. No subscriptions. No automated billing. No scalable monthly recurring revenue.
The good news? Once you understand how Stripe works with SaaS Mode, the setup is straightforward. The bad news? One wrong configuration can create billing chaos that takes days to untangle.
This guide walks you through the entire Stripe setup for SaaS Mode step by step. No fluff. No vague instructions. Just practical, real-world guidance from someone who has seen agencies get this right — and very wrong.
Key Takeaways
- Stripe must be connected at the agency level, not the sub-account level
- SaaS plans are created inside the SaaS Configurator, not directly in Stripe
- Deleting Stripe products breaks your SaaS billing system
- Rebilling phone, AI, and messaging can turn costs into profit
- Always test your checkout flow before going live
- Understanding Stripe fees helps you price your SaaS plans properly
Let’s get into it.
Why Stripe Is Required for SaaS Mode
SaaS Mode inside GoHighLevel allows agencies to sell the platform as their own branded software. But billing has to live somewhere, and that somewhere is Stripe.
Stripe handles:
- Recurring subscriptions
- One-time setup fees
- Trials
- Failed payment retries
- Refunds
- Subscription upgrades and downgrades
When a client signs up through your SaaS checkout link, this is what happens behind the scenes:
- Stripe processes the payment
- Stripe creates a subscription
- HighLevel creates a new sub-account
- Your snapshot loads automatically
- Rebilling features activate
Everything flows from Stripe. If Stripe disconnects or is misconfigured, that entire chain breaks.
Before You Start
Before connecting Stripe to SaaS Mode, make sure you have:
- An active Stripe account in good standing
- Full admin access to your HighLevel agency view
- SaaS Mode enabled in your agency settings
- A clear idea of your pricing model
Also, understand this clearly: Stripe must be connected at the agency level. Not inside a client sub-account. Not inside a location.
Agency level only.
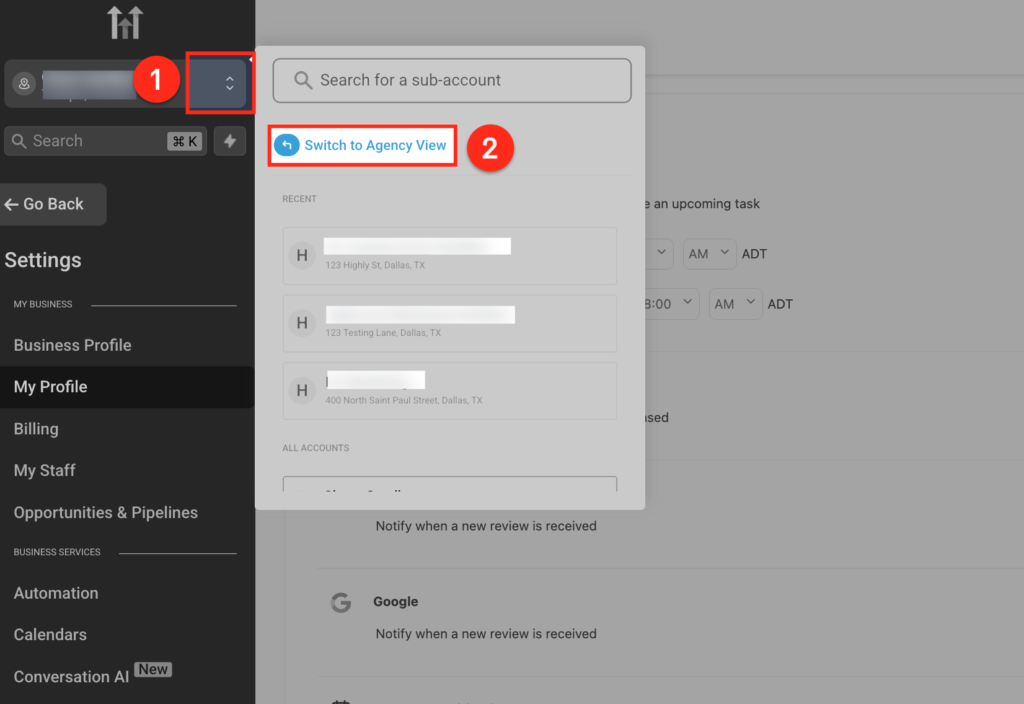
Step 1 Switch to Agency View
Inside HighLevel:
- Click the sub-account switcher in the top left
- Select “Switch to Agency View.”
If you do not see Agency View, you are not logged in as an agency admin.
All SaaS billing configuration lives at this level.
Step 2 Connect Stripe to HighLevel
Once inside Agency View:
- Go to settings.
- Click Payments
- Select Connect to Stripe
- Log into your Stripe account
- Authorize the connection
That is it. Stripe is now connected to your agency.
But we are not done.

Step 3 Understand Stripe Fees Before Pricing Your SaaS
Before creating your SaaS plans, you need to understand Stripe’s fee structure. This prevents underpricing.
Stripe standard US pricing:
- 2.9 percent of the transaction amount
- Plus $0.30 per successful charge
Let’s break this down with real numbers.
Example 1: $97 Monthly Plan
$97 subscription
Stripe fee calculation:
- 2.9 percent of $97 = $2.81
- Plus $0.30
- Total Stripe fee = $3.11
You receive:
$97 – $3.11 = $93.89
Example 2: $297 Monthly Plan
$297 subscription
Stripe fee:
- 2.9 percent of $297 = $8.61
- Plus $0.30
- Total fee = $8.91
You receive:
$297 – $8.91 = $288.09
If you have 100 clients on a $97 plan, Stripe fees alone cost you about:
100 × $3.11 = $311 per month
That is why understanding exact breakdown matters.
Step 4 Create SaaS Plans in the SaaS Configurator
Now comes the important part.
Do not create products manually inside Stripe.
Instead:
- Go to Agency Settings
- Click SaaS Configurator
- Click Create Plan
Inside the plan setup, you will configure:
- Plan name
- Monthly or yearly pricing
- Free trial duration
- Snapshot attachment
- Included features
- Twilio or LC Phone rebilling markup
When you save the plan, HighLevel automatically creates Stripe products and price IDs in your connected Stripe account.
This is the correct way to generate Stripe subscription products for Saa
Step 5 Attach a Snapshot
Each SaaS plan can automatically deploy a snapshot.
For example:
- Med Spa snapshot
- Real estate automation snapshot
- Coaching funnel snapshot
When a user subscribes, that snapshot loads instantly into their new sub-account.
This is what makes SaaS Mode scalable. No manual setup.
Step 6 Configure Rebilling for Profit
Here is where smart agencies increase margins.
Instead of absorbing costs, you can rebill:
- Phone usage
- SMS
- MMS
- AI usage
- Email sending
Let’s say your actual SMS cost is $0.0079 per segment.
You can rebill at:
- $0.012 per segment
That gives you roughly $0.0041 profit per SMS segment.
If a client sends 5,000 segments per month:
5,000 × 0.0041 = $20.50 extra profit per client
Multiply that by 50 clients:
$1,025 additional monthly profit
This is how SaaS Mode becomes powerful.
Step 7 Test the Entire Subscription Flow
Never go live without testing.
Use your SaaS signup link and:
- Enter your own credit card
- Complete checkout
- Confirm Stripe shows an active subscription
- Confirm HighLevel creates the sub-account
- Confirm the snapshot loads
Then cancel your test subscription inside Stripe.
This simple step prevents embarrassing launch issues.
Step 8 Copy Stripe Product Details
Inside each SaaS plan:
- Click “Show Stripe Product Details.”
- Copy the Stripe Price ID
Do not delete these products in Stripe.
If you delete them, subscriptions will fail and your SaaS configurator may require a reset.
Common Stripe Setup Mistakes
Connecting Stripe Inside a Sub-Account
Wrong. Stripe must connect at the agency level.
Editing Prices Directly in Stripe
Always change pricing inside SaaS Configurator. Otherwise, Stripe and HighLevel may desync.
Deleting Stripe Products
This breaks subscriptions.
Using Multiple Stripe Accounts
Stick to one primary Stripe account for clarity and reporting consistency.
Advanced Tips for Scaling
Add Setup Fees
You can add a one-time onboarding fee, for example.
- $497 setup
- Plus $197 per month
Stripe handles this automatically during checkout.
Offer annual discounts.
Instead of:
$197 per month × 12 = $2,364 per year
Offer:
$1,997 per year
Stripe supports yearly billing seamlessly.
Monitor Failed Payments
Inside Stripe:
- Enable Smart Retries
- Enable email alerts
- Use dunning emails
This reduces churn dramatically.
What Happens If Stripe Disconnects
If Stripe disconnects:
- New clients cannot subscribe
- Existing renewals may fail
- SaaS signup pages stop working
Always ensure:
- Your Stripe account is verified
- Your bank account is active
- You maintain good standing
Frequently Asked Questions
Can I use PayPal instead of Stripe for SaaS Mode?
Should I create plans directly in Stripe?
No. Always create plans in SaaS Configurator. HighLevel will generate Stripe products automatically.
Can I change pricing later?
Yes. Update pricing inside SaaS Configurator. For existing subscribers, you may need to manage subscription updates inside Stripe carefully.
What happens to existing clients if I disconnect Stripe?
Subscriptions may stop renewing. Always resolve Stripe issues immediately.
Can I charge both monthly and yearly plans?
Yes. You can create multiple SaaS plans with different billing intervals.
Conclusion
Setting up Stripe for SaaS Mode is not complicated, but it must be done correctly.
Stripe is the financial backbone of your SaaS business. It processes subscriptions, manages recurring revenue, and ensures automated account creation inside HighLevel.
When configured properly, it allows you to:
- Scale recurring revenue
- Automate onboarding
- Increase profit through rebilling
- Reduce manual billing headaches
Take your time. Follow each step carefully. Test everything before launch.
Once Stripe is connected correctly, your SaaS infrastructure is no longer fragile. It becomes predictable, automated, and scalable.
And that is when real growth begins.